Showing posts with label AR-15 Build. Show all posts

7/27/17

The AR-15 Build: Recoil Spring and POF Roller Cam

So after doing some additional research, I found that both my original spring and cam selection may have been misguided.

I want this gun to be something of a hard working tool, and not so much a "gamer's toy" that might be more finicky in terms of reliability. As such, I decided to go with a full power recoil spring. Further reading suggests that flat wire springs might be a better alternative to conventional round wire springs.


Strike Industries claims increased forward bolt load and reduced compression force, along with higher spring life compared to its MilSpec counterpart. What this means is that it closes the bolt with more force while being easier to cycle the action. This is made possible because of the flat wire design, allowing for the spring to be physically longer which means spring strength can be adjusted. Either way, the longer spring life and reduced "twang" is what sold me.

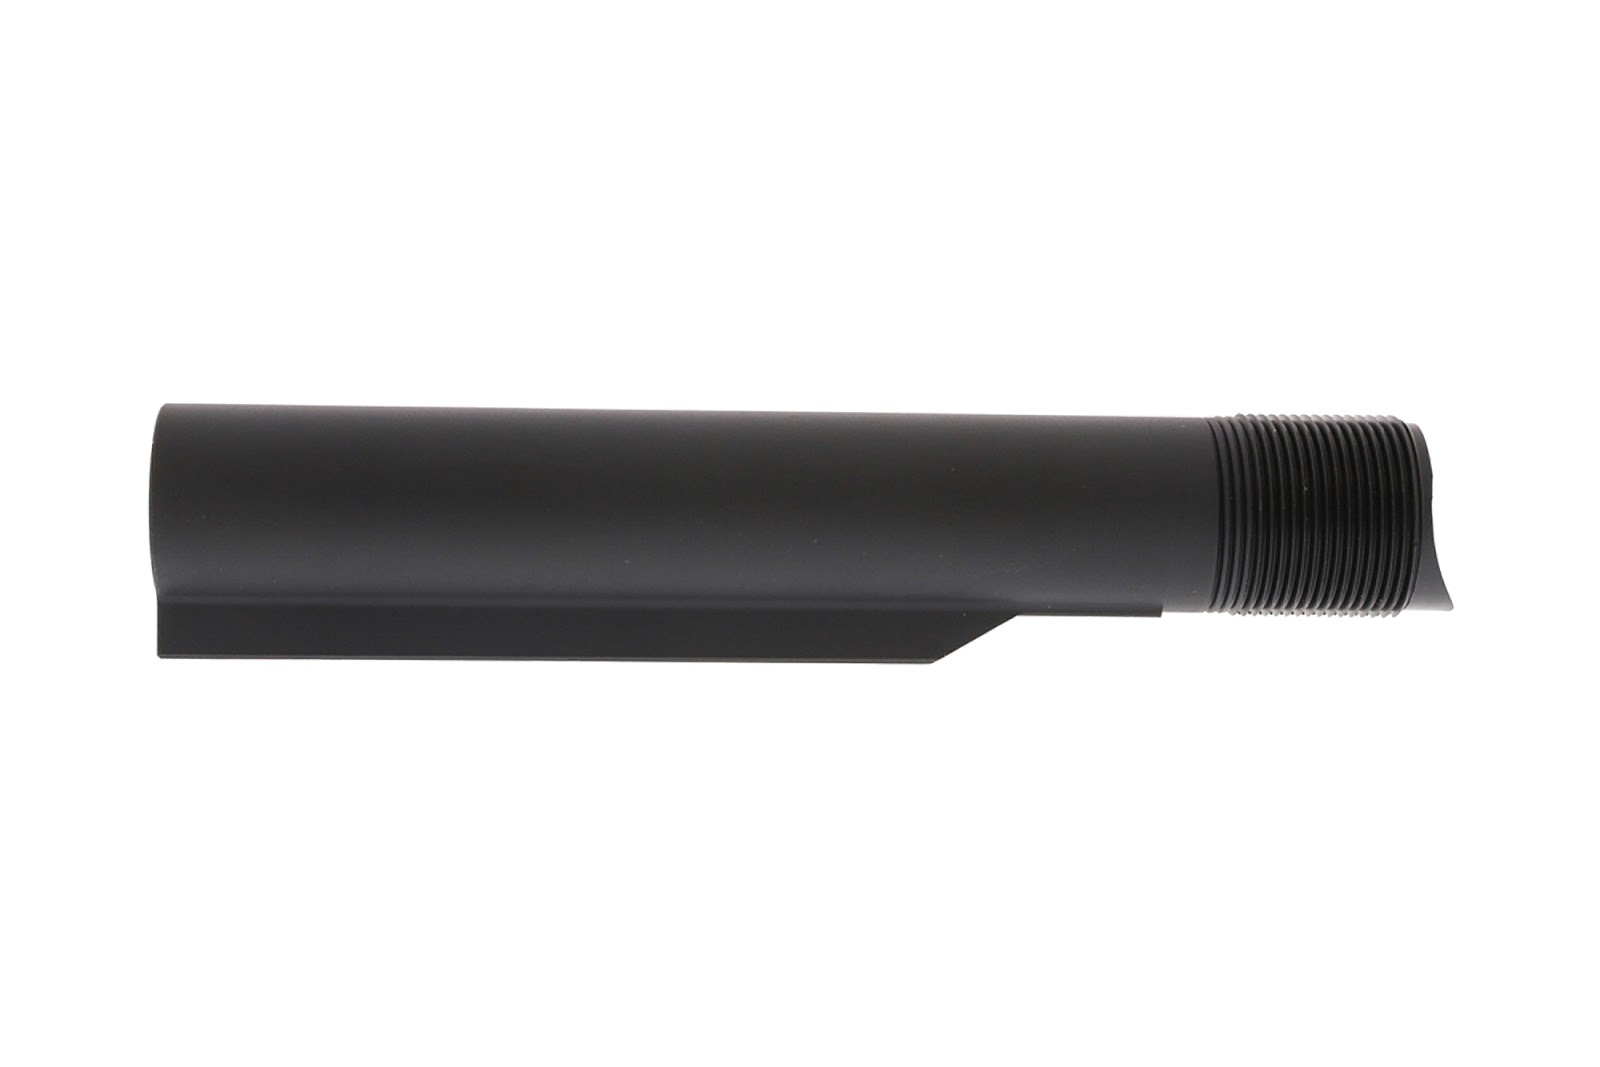
As for the cam, it turns out that some piston AR's suffer from something called receiver gouge. This issue is common enough in piston AR's that POF decided to make a special cam pin that helps to reduce the chance of developing receiver gouge.


The top of the cam pin is basically a roller bearing instead of a flat piece of metal. This means that if the cam pin were to contact the upper receiver, the bearing would, in theory, roll along the receiver while a standard cam pin might scrape and dig into the receiver. Looking at pictures of rifles with receiver gouge was enough to make me order this part. At the time I ordered this, most everyone was out of stock. I was impatient and ordered it, and now you can find better deals all over the place. Learn from my mistakes, you don't need to order non-critical parts until you absolutely have to. Even if I completed the rifle, I could have run the regular cam until I got a better deal on this.

As my build list now stands:


    Total cost to date: $1032.36
    Estimated cost remaining: $824.62

    Estimated Grand Total: $1,856.98

    The cost of the roller cam brought the total up again, but I'm still under $2000 total including tools. More updates to come!

    'Till next time.


    -AA

    7/26/17

    The AR-15 Build: MAGPUL K Grip, Midwest Industries Handguard, Elftmann Trigger, and VG6 Epsilon

    After previously comparing the BCM Gunfighter grip and the MAGPUL K Grip, I decided that the MAGPUL grip was a better for for me. 

    Brownells had a free shipping coupon code, and I jumped on the chance to snag the new grip and returned the BCM grip that I originally ordered.

    After spending many hours researching what kind of handguard I wanted to use for this build, I finally ended up deciding to go with the Midwest Industries Gen3 Lightweight.


    The original plan was to go with the Odin Works O2 Lite Rail, but I decided against it mainly because if it's larger outer diameter. It is also just a touch heavier than the Midwest rail, and I bought this for less than what I would have paid for the O2 Lite. To top it all off, the Midwest rail comes with its own barrel nut tool, which the O2 Lite required you to either already have a suitable 1 1/2" wrench or to buy one separately. I ordered the handguard from Jet, and they give extra discounts for things like opting out of free returns, so I used that to my advantage.

    Found a good deal on Schuyler Arms on the VG6 Epsilon muzzle break, so I grabbed it while I could.


    I decided to go with the Epsilon over the Gamma after watching this particular YouTube video that has shooting footage of both muzzle devices. From what I could gather, I saw that the Gamma looked to overcompensate and dip the muzzle down while the Epsilon did a great job at keeping the muzzle very flat. I've shot a rifle in the past that was equipped with a Battle Comp which also overcompensated and dipped the muzzle down. I did not like how that rifle shot at all, so I opted for the Epsilon.

    And finally, the trigger. I read a great article that The Truth About Guns posted, and they had great things to say about the Elftmann trigger.


    In my quest for a rifle that would be as light as possible, I opted for the 3-Gun trigger option, as it had the most speed cuts in it. I know that it seems silly, as the weight difference between all the models are probably next to nothing, but I figured that the additional cost of the 3-Gun trigger over the other options was reasonable enough to splurge on it. I also decided to go for the straight trigger just to try it. I've never shot an AR with a flat trigger face before, and I figured this would be a good chance to try one out.

    Now here's where things get interesting. The company that I bought the trigger from has apparently gone belly up since I've made my purchase. As such, I will still list the company name in the breakdown, but I'll link to Elftmann's website instead.

    As my build list now stands:


    Total cost to date: $988.94
    Estimated cost remaining: $839.61

    Estimated Grand Total: $1,828.55

    I have lots more parts ordered, so I'll have some rapid updates coming up!

    'Till next time.


    -AA

    1/5/17

    The AR-15 Build: Sharps Rifle Co. Relia-Bolt

    Since the plan for this particular build is for it to use a short stroke piston gas system, the kit that I'm interested in comes with a bolt carrier but no bolt. As such, I've been looking at different bolts to use in this build that would be practical, functional, and maybe one with some cool points too. Enter the Sharps Rifle Company Relia-Bolt!


    Originally I was planning on using a Criterion hybrid barrel with a headspaced BCM bolt. After doing some research, it seems like most reputable bolt and barrel companies will produce products that are within very tight tolerances which make it possible to get reliable and safe function from most barrel/bolt combos. This allows me to free up both my barrel and bolt choices for this build.

    Note the angled locking lugs and their rounded shape, features unique to the Relia-Bolt.

    I will also preface this by saying that there are some very particular features of that Relia-Bolt that had no impact on my choice to use it. I does not matter to me that they redesigned the locking lugs to allow them to operate under extreme conditions, nor did it matter to me that the metal they decided to use is S7 tool steel rather than the industry standard Carpenter 158 steel. The only reasons that I chose the Relia-Bolt were because of its price and its NP3 Plus coating.

    A view from the front at the rounded profile of the lugs.

    On the NP3 coating, it has been explained to me, in short, as superior to NiB (nickel boron) coatings. Quoted from http://coatingtechnologiesinc.com/np3/ under A Unique Concept in Coating Technology, it states that "NP3 is a surface treatment for various metals and alloys that combines sub-micron particles of PTFE (Polytetrafluoroethylene) with autocatalytically applied nickel/phosphorus. The result is an accurately applied, dry lubricated, low friction surface that is extremely hard and resistant to wear.
    The PTFE is evenly distributed throughout and locked into the nickel phosphorus matrix creating a true and stable composite. As wear occurs fresh particles of PTFE are exposed to keep the surface lubricated. This lubrication is available as long as the integrity of the coating is intact."


    As for the price, I could not find a better deal on a quality bolt. Period.

    I paid just $60.79 for the Sharps Relia-Bolt, and that includes the uprated NP3 Plus coating as well as shipping to my front door. The Criterion barrel that I was originally thinking about comes with a BCM bolt, and to buy that by itself, it costs $79.95 before shipping. Brownells sells Daniel Defense bolts for $66.00, but again, that also doesn't include shipping. For specialty coated bolts, Brownells also sells the FailZero Exo-Treated Nickel Boron Bolt Assembly, but as I've been told, NiB is inferior to NP3, and the cost of the unit is $86.20 before shipping. From everything that I can tell, I'm paying less than a bolt with a standard phosphate finish while getting better performance than a more expensive NiB coating. That sounds like a win to me!

    I know that there have been problems with the bolt in the past with them breaking, but it seems to me that Sharps has completely fixed the problem. Even so, Sharps offers a lifetime warranty on their products, so should I encounter issues, they'll cover it.

    As a side note, after trying the Magpul MOE K grip, I found that I no longer need a few parts that I originally thought were necessary. These are namely the extended magazine release and the extended bolt catch. As such, I will be removing them for the list, and may reinvest the savings into this build in the future.

    As my build list now stands:


    Total cost to date: $533.53
    Estimated cost remaining: $1,351.75

    Estimated Grand Total: $1,885.28


    I am back under my $2000 budget, and things are looking good! It feels like I'm in the home stretch, but I know that from now on, it's going to be mostly the larger purchases. Hopefully there are some good sales soon!

    'Till next time.


    -AA

    1/4/17

    The AR-15 Build: Charging Handle, Safety Selector, Dust Cover, and goodies!

    Brownells keeps on teasing me with all these sales, and I'm ashamed to admit that it's working on me. Their latest sale was $15 off of $100, which is even better than the previous $10 off of $75!

    This time I bought the BCM charging handle, Seekins safety selector, Tapco stock wrench, Strike Industries dust cover, and a chamber flag.

    parts photos

    BCM Gunfighter Charging Handle MOD 5 (small):
    I am not only building this AR-15 to be practical, but to also be fun. I'm sure that a normal charging handle would work just fine, but the BCM version is cooler. It may also help my street cred when I see other oper8orz at the range.


    I decided to go with the MOD 5 because of size and weight. I don't envision myself needing a huge charging handle latch, and because this latch is physically smaller than the others, there will be some minuscule weight savings over the other versions which I will gladly take.

    Seekins Precision Ambidextrous Safety Selector Kit:
    Again, a stock safety isn't cool, and I want to be cool. I couldn't find any hard data on weight, but the Seekins safety levers seem to be made of aluminum that's been milled out on the back to reduce weight.


    This particular safety is interesting because it has the option to choose from a 90 degree throw and a shorter 60 degree throw which I find very nice. I'll definitely give the short throw a try, but if I don't like it, I can just swap back to the regular 90 degrees. The price on this ambi safety is also very attractive, even without the Brownells discount.

    Strike Industries Enhanced Ultimate Dust Cover:
    As the theme of this post goes, standard dust covers aren't cool, and this replacement is cool. Besides that, I wanted to keep the weight down on this build where I can, and this seemed like a good place to save some weight without breaking the bank. I believe that V Seven also makes a light weight aluminum cover, but it's to my understanding that the polymer SI cover is even lighter.


    The dust cover comes in black and FDE, as well as a few different styles, but I just went with the regular back. Maybe I should have gone with the version with cuts in it for added weight savings though..

    TAPCO AR Stock Wrench - Gen 2 Enhanced:
    I needed a wrench for the castle nut. I also don't need a regular barrel nut wrench because the handguard I'm looking at uses a proprietary barrel nut, so I didn't need a full armorers wrench. This does have a slot for a muzzle device though, and that's a feature that will come in handy too.


    It's also very cheap.

    Chamber Flag:
    With the above four items, I was just under the $100 I needed to redeem the coupon code. This chamber flag got me right up to $100.30, which is close enough for me! Because these are dollar amount discounts instead of percentages, they are the most effective at the given limit. This means that a $15 discount at $100 is more effective than the same discount at $200 or any amount higher than $100.


    It's not like I won't use it either. I was thinking of making one with my 3D printer, but I needed to reach $100 for the discount to be applied, so I bought this instead.


    I don't know how I forgot about the ambi safety in my original parts list, so I'll be adding it in now along with the chamber flag.


    Total cost to date: $472.74
    Estimated cost remaining: $1,533.83

    Estimated Grand Total: $2,006.57


    Again, you can see that I went over my $2000 budget by just a hair. I'll keep hunting for deals and discounts wherever I can, and I'll get the price back down where it should be.

    'Till next time.


    -AA

    12/31/16

    The AR-15 Build: buffer tube and stock

    December 21, 2016 was when Brownell's put our a pretty good promo code that I decided to take advantage of. The offer was $10 off $75 plus free standard shipping! That's over a 10% discount if you spend under $100, which I absolutely did.

    I decided to buy the stock and buffer tube so that I can try out the BCM Gunfighter Grip that I have and see if I might want to try a MAGPUL MOE K grip instead. Even without a barrel or handguard, being able to shoulder the lower properly will be a huge help in my eventual grip decision.


    POF Anti-Tilt Buffer Tube - MilSpec
    Eventually, I envision this build to utilize a piston gas system. As such, carrier tilt can be a common issue for piston run AR-15's. The answer is an anti-tilt buffer tube! If you aren't familiar with buffer tubes, a standard buffer tube is cut flush at the threads. This provides no additional support to the carrier as it reciprocates in the firearm.

    The bottom of the threaded area is flush with the rest of the buffer tube


    An anti-tilt buffer tube has an elongated bottom area that always supports the bottom of the carrier. As soon as the carrier begins its rearward movement, it is already being supported by the buffer tube, so there is less carrier tilt and less wear to the internal components.

    The bottom of the threaded area has the additional lip that supports the carrier even when fully forward


    This also happened to be the best price that I could find on Brownell's for an anti-tilt buffer tube, and the added discount was a big plus as well.


    Mission First Tactical Battlelink Minimalist Stock
    As far as I can tell, this is the lightest collapsible stock on the market. It is also very decently priced at around $50 retail. Brownell's already had it for less, and the added discount along with it's incredibly light weight design made this purchase a no brainer.


    That makes two more major components bought for the build! My parts list is now looking something like this:


      Total cost to date: $387.44
      Estimated cost remaining: $1,602.45

      Estimated Grand Total: $1989.89


      Soon I'll see if I can find someone who can loan me a MOE K grip here locally so I can compare it to my Gunfighter Grip.


      'Till next time.


      -AA

      12/19/16

      The AR-15 Upper Receiver: The build continues!

      Since receiving my beautiful Texas Special Edition lower receiver, I've been itching to get the upper to complete the base that the rest of my AR-15 will be built around.

      I am not a war fighter. I am not military or law enforcement. I do not foresee myself in a situation where I would need to slam a mechanical piston into my bolt carrier group to force it forward and seat a stubborn round (and most likely either inset the bullet in the case or cause an even worse jam). As such, I decided that I wanted to go with an upper with no forward assist to save some weight and reduce the cost in parts by a small amount. Luckily enough, Aero Precision makes just the upper! It has provisions for a dust cover, includes a shell deflector, but has omitted the forward assist.

      Shell deflector, provisions for a dust cover, but no forward assist!

      Now here is where things get interesting. I originally saw the upper for sale at Brownell's, but what stood out to me the most was that there was an American flag laser engraved onto the upper, just above the charging handle area. I'm quite happy to be an American, but I wondered if there was an upper without the laser engraving that was cheaper to buy. Sure enough, after spending much time and effort behind Google, I found some being sold between $65 and $70. After assessing about three different online retailers on their tax and shipping costs, I was stunned to find that the cheapest upper would not be a stripped upper, but one that comes with a standard milspec dust cover already installed. Granite Ridge Outfitters had their upper on sale for $69.95 with free shipping and no tax cost to me. Other retailers has uppers without dust covers selling for $65 flat, but their shipping costs brought their total cost to around $75.

      Packaging looks familiar..! 

      The lower with no forward assist!

      Now that I have an upper with a dust cover, this presents an interesting opportunity for me. When I buy the replacement cover, I will measure the weight of both of them to see how much heaver the standard dust cover is. Granite Ridge also threw in these three stickers that are very cool, thanks!

      As my build stands now..


      Brownells


        Total cost to date: $305.23
        Estimated cost remaining: $1,688.69

        Estimated Grand Total: $1993.92

        So now I'm back under my $2000 budget, and I have a beautifully matched set of Aero Precision receivers to base the rest of my build on. Hopefully I can grab a few more parts this winter season that will start making my random pile of pieces look more like an actual rifle.


        'Till next time.

        -AA

        The AR-15 Lower Receiver: God Bless Texas!

        I first laid eyes on the lower receiver of my dreams when I was doing random Google searches for Texas related AR-15 lowers. There are lots of different companies in Texas making lowers, and lots of lowers with Texas related markings or engravings, but nothing was really my style. All either too plain, too expensive, or too gaudy.

        It was at this point that I stumbled upon the Aero Precision Special Texas Edition lower receiver. It was absolutely perfect. The outline of Texas is engraved on the right hand side, and a star is cut all the way through the mag well in the middle of the state. It's just the right amount of flair that makes me really excited, and it's design is so simple that I find it hard to believe that no one else is making a lower like this.


        After looking around for people selling this lower, my heart completely broke. Since this lower is a special edition, they are hard to come by, and the people that do have them are charging a large premium over the standard Aero Precision lowers. As such, I prepared myself to never find one for a good price.

        That's when my prayers were answered; Primary Arms was selling the Texas Edition lowers, and they were only $99.99! I immediately jumped on the chance and bought one. After taxes, shipping, and a $25 FFL fee, the grand total for the lower came out to $139.76.

         Your standard Aero Precision cardboard box

        Your not so standard Texas Special Edition lower receiver!

        The enabler in me reasons that this lower was absolutely worth the extra cost due to the weight savings of the cutout star. The realist in me knows that I bought this purely because of its cool factor.

        If you want save money on a forged upper and lower, I wholeheartedly recommend that you look into the Anderson Arms offerings. I am buying an Aero Precision upper to go along with this particular lower just so that I have matching manufacturers making both the upper and lower receivers. I hear that matching manufacturers for the upper and lower is generally a good practice to follow, and for my first build, I don't see why I wouldn't want to take this advice.

        Now that this exquisite lower is in my possession, my parts list is as follows:


        Total cost to date: $235.28
        Estimated cost remaining: $1,777.99

        Estimated Grand Total: $2013.27

        As you can see, I've gone over my estimated budget by just a bit with this lower. I might swap out the BCM grip for the cheaper and lighter MAGPUL MOE K grip, but I'll have to play around with the BCM grip a bit before making any final decisions. I will also continue to hunt for better prices from different retailers, so I'm confident that I can stay under my $2000 budget.

        Be on the look out for Christmas/New Years purchases as well, I'm feeling motivated now that I have a lower!


        'Till next time.

        -AA